
bkoplkhjlkgobpjafgndkdgeolbbgkoa
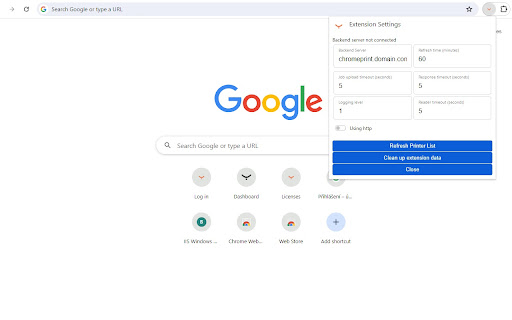

Enables printing from the Google Chrome browser to YSoft SAFEQ. The YSoft SAFEQ Chrome Print extension allows the release of a print job from a Google Chrome browser. The job is sent from the Google Chrome browser to the YSoft SAFEQ Chrome Print backend server, which is an independent component installed on a dedicated server. The backend server processes the job and sends it to YSoft SAFEQ. The backend server is available in Extension store on https://portal.ysoft.com as "GOOGLE CHROME PRINT" (extension code SWC-133) The print administrator registers a printer in YSoft SAFEQ Chrome Print backend server and assigns it to a user or role. A user will add the extension to the Google Chrome browser and configure the connection to the YSoft SAFEQ Chrome Print backend server. When the user is registered in the system, an assigned printer will be displayed in the list of available printers in the print dialog. The user can send a print job to this printer using all available print features and the print job will arrive to the YSoft SAFEQ.

Lexmark Cloud Print Management for Chrome
ATTENTION: The Lexmark Cloud Print Management for Chrome extension will only work if the end user has a valid Lexmark Cloud Services contract with Lexmark. NOTE: This version of Lexmark Cloud Print Management for Chrome defaults to the EU datacenter. Links for the properly configured extension are available through the Lexmark Cloud Print Management portal. Cloud Print Management for Chrome is part of the Lexmark Cloud Print Management solution. The Cloud Print Management for Chrome extension provides access from the Google Chrome browser to Lexmark's Cloud Print Management for printing. Instead of sending documents through a print server to a designated print device— where the pages sit out in public view until they are retrieved—they are transferred to the Lexmark Cloud where they are held in a personal queue until the user logs in or swipes their badge (authenticates) at the printer. For more information on Lexmark Cloud Services, go to https://www.lexmark.com/en_us/solutions/lexmark-cloud-services.html To view the End User License Agreement, go to https://lexmark.com/LXKCloudChromeExt-eula

Cloud Print
Cloud Print lets you print the good parts of any web page while skipping ads and other junk.! Our FREE Cloud Print will enable you to modify any web page to make it print exactly the way you want. ★ Modify Before Printing Click to delete any content before printing. Remove all images or individual images to save on printer ink. Change the text size from larger to smaller. ★ Print or Save as PDF or HTML Generate PDFs or HTMLs for archiving, sharing, or saving. PDFs and HTMLs will include clickable links, and source URL so you can continue to interact. ★★★ Main Features ★★★ ★ Save Paper and Ink When You Print ★ Remove, Isolate, or resize any part of a web page ★ Change font size and type ★ Remove margins, images, and backgrounds ★ Save as PDF or HTML Modify the web page exactly the way you wish/want before you print it out/save as a PDF file.

Dispatcher Paragon Chrome Print
Enables printing from the Google Chrome browser to Dispatcher Paragon. The Dispatcher Paragon Chrome Print extension allows the release of a print job from a Google Chrome browser. The job is sent from the Google Chrome browser to the Dispatcher Paragon Chrome Print backend server, which is an independent component installed on a dedicated server. The backend server processes the job and sends it to Dispatcher Paragon. The print administrator registers a printer in Dispatcher Paragon Chrome Print backend server and assigns it to a user or role. A user will add the extension to the Google Chrome browser and configure the connection to the Dispatcher Paragon Chrome Print backend server. When the user is registered in the system, an assigned printer will be displayed in the list of available printers in the print dialog. The user can send a print job to this printer using all available print features and the print job will arrive to the Dispatcher Paragon.

Print Edit WE
Edit web pages prior to printing. Delete, hide and format elements. Edit text. Remove adverts and sidebars. Print Edit WE provides facilities to edit the contents of a web page prior to printing or saving as HTML or MHTML. Elements in the web page can be formatted, hidden or deleted and text can be edited or inserted. Unwanted content, such as adverts and sidebars, can easily be removed. Note, to use the Save As HTML feature, the Save Page WE extension (version 14.0 or later) must be installed and enabled. To start editing the page, click on the Print Edit WE button on the main toolbar, or select Print Edit WE > Start Editing on the context menu. A blue 'EDIT' (editing) badge will appear on the button. The 'Web Style' feature is disabled by default, so that the page displayed looks similar to how the page would look if printed normally. When the 'Web Style' feature is enabled, the page displayed will look similar to how the page looks during normal browsing. The 'Text Pieces' feature is disabled by default, so that only whole blocks of text can be selected. When the 'Text Pieces' feature is enabled, individual pieces of text can be selected and edited and line breaks are displayed. The 'View More' feature is disabled by default, so that only elements that are normally visible are displayed. When the 'View More' feature is enabled, elements that are normally invisible are also displayed and can be selected and edited. An edited web page can be saved as a single HTML file, which can be viewed or re-edited using Firefox or Chrome. An edited web page can also be saved as a MHTML file. Click the 'Preview' button to see how the edited web page will look when printed. Close the preview window to return to editing. The buttons available on the Print Edit WE toolbar are: • Select - select all or graphic or page-break elements, or re-select elements from previous command. • Deselect - deselect all currently selected elements. • Hide - hide currently selected elements. • Delete - delete currently selected elements. • Hide Except - hide all elements except those currently selected. • Delete Except - delete all elements except those currently selected, with varying restrictions. • Format - apply format properties to currently selected elements. • Text - edit a text piece or insert new text before or after element. • Undo - undo the action of previous edit command. • Undo All - undo the actions of all previous edit commands. • Save - save web page as a single HTML or MHTML file. • Text Pieces - allow selection and editing of individual text pieces. • View More - view invisible elements in the page. • Web Style - alternately remove or apply CSS print stylesheets. • Preview - open the Print Preview window. • Close - finish editing. • Tools - access to the Fix Page Breaks features and to the Options dialog. • Help - show the Help panel. The Delete Except button has three menu items: • Restricted - higher level elements retain their size and relative position. • Without Float - higher level elements retain their size and relative position, but cannot float right. • Unrestricted - higher level elements are resized and repositioned freely, but cannot float right. In this context, “higher level elements” means the ancestors (parent, grandparent, etc) of the currently selected elements. The mouse actions are: • Move - move highlight box to highlight element. • Click - select or deselect highlighted element. • Right-Click - inspect format properties for highlighted element. • Drag - select all elements within capture box. • Shift+Drag - select all graphic elements within capture box. • Ctrl+Drag - deselect all elements within capture box. Distributed under the GNU General Public License version 2. See LICENCE.txt file and http://www.gnu.org/licenses/